
The seeds of this blog post were grown out of a game that Meredith came up with that I bet she will play with her students sometime this year for 3 reasons.... it's fun, it's easy, AND they learn the material!
Note Name Scavenger Hunt
1. Download and print the Treble Clef Flash Cards from Making Music Fun

2. Cut up the cards and then "hide" the ones that you would like your students to review all over your room. (I trimmed mine down some to make them easier to hide)

DON'T FORGET - put numbers on the cards BEFORE you hide them..... if you don't you get to find them all again and put numbers on them......that's why my 12 looks so wompy...... I was working at an odd angle. ALSO - go ahead and make a key so that you can give the correct answers easily.


3. Copy a numbered sheet for each student so they can write down the name of the note next to the correct number. This is the one that I created.......... (I'm not proficient yet on sharing my files, so please let me know if you are successful in downloading this one.)

4. Make sure that everyone has a pencil, lapboard/clipboard and a paper before you begin.
 |
| This one is under my board |
TIPS:
1. My favorite part about this activity is that it adds movement and elements of play into a plain old review. I also like the fact that the students can work together. As I wander around the room with the class, I get a real sense of where the holes are in their thinking. I also buddy up with students who are struggling and the playful atmosphere allows me to do some serious reteaching.
2. I NEVER give prizes!
3. If there are areas in your room that you want your students to stay away from (like your teacher desk?), make that clear before you begin. By nature, a scavenger hunt is going to lead your students into poking around your piles in their attempt to find that last item on their list.......I find that this activity is best when my room is mostly picked up, but not neat as a pin.... if things are too neat then the items that the students need to find are too obvious.
4. Be prepared to set up procedures for moving around the classroom...... I don't mind a little excited scurrying across the room, or an excited exclamation followed by a mad dash when a student finds a new note...... but that may not be you....AND that type of self regulation doesn't suite every class...... so determine what noise and movement level you can tolerate and let them hunt to their hearts content!
5. Depending on how much time your students have spent on a particular subject of review, you may want to strategically place areas for students to check their work.
 |
| This student has found a note right next to my easel where I had quickly drawn a giant "cheat sheet" so that students could make SURE they labeled their notes correctly. |
Other ideas:
During a different, younger class, I had my students use the exact same notes, but instead of naming the notes, they found the lines and spaces. Instead of writing a letter, these students would write and S or an L.

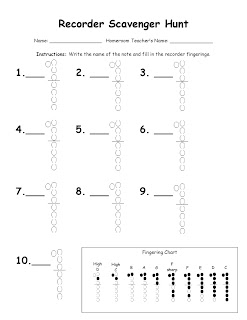
I think I'm going to try this activity to review recorder fingerings..... I will re-hide only the notes that I need and use this sheet to accompany..... I plan on having my students name the note AND color in the fingering chart.
Original Game as played by Meredith Leblanc -
1. Cut out instruments from your favorite instrument worksheet
2. Number them and tape them around the room.
3. Prepare two answer sheets. The answer sheet for older students is a list of numbers next to a blank where there is room to write down the name of the instrument. The answer sheet for younger students might be multiple choice for the names. The answer sheet that Meredith used to use with kindergarten had numbers on one side and instrument pictures on the other..... the students would draw a line between the instrument and the correct number.
Love this idea! Will be using as a review for my students! Hoping I may be able to take some groups of students outside to do this before the weather gets too cold. Thank you!
ReplyDelete